
Install solid wood parquet flooring
Laying solid wood parquet: Lay it yourself or hire a professional? No matter what you decide – thanks to first-class quality and a variety of installation methods, laying solid wood parquet will always be a successful project.
With brackets

Laying with brackets
Tool checklist

hammer

Hitting block

Wedges

saw

glue

Tin snips
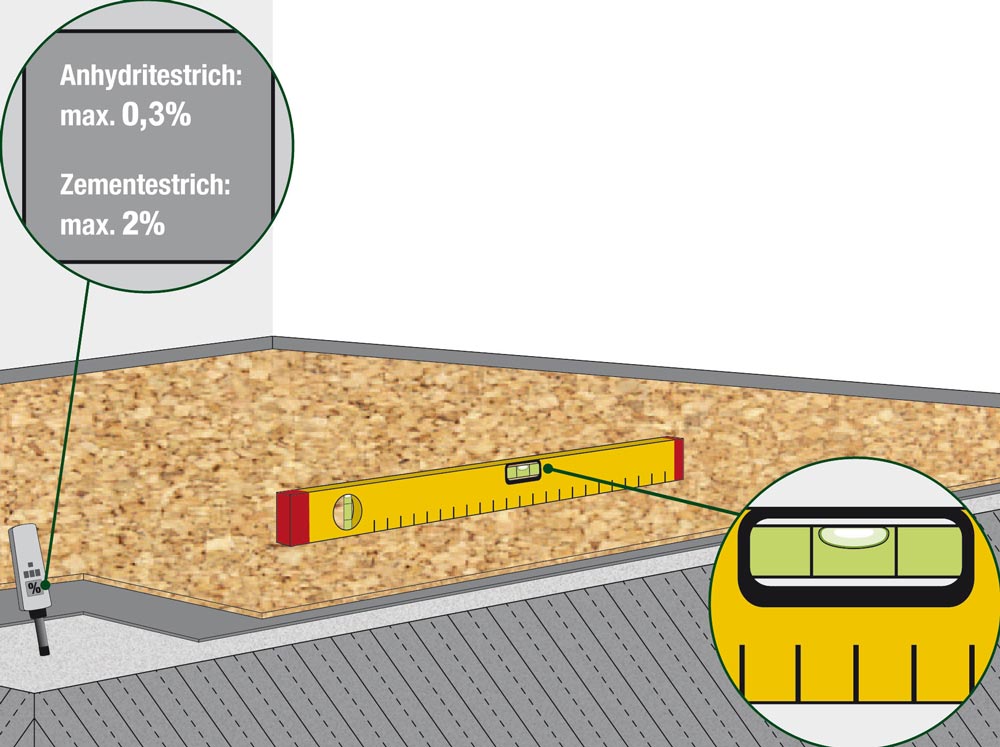
1. Preparation
The surface must be firm, level and dry. If there is a risk of rising damp, a moisture barrier (e.g. PE film 200μ) must be installed and pulled up a little on the walls. For impact sound insulation, we recommend rolled cork or impact sound insulation with a built-in vapor barrier.
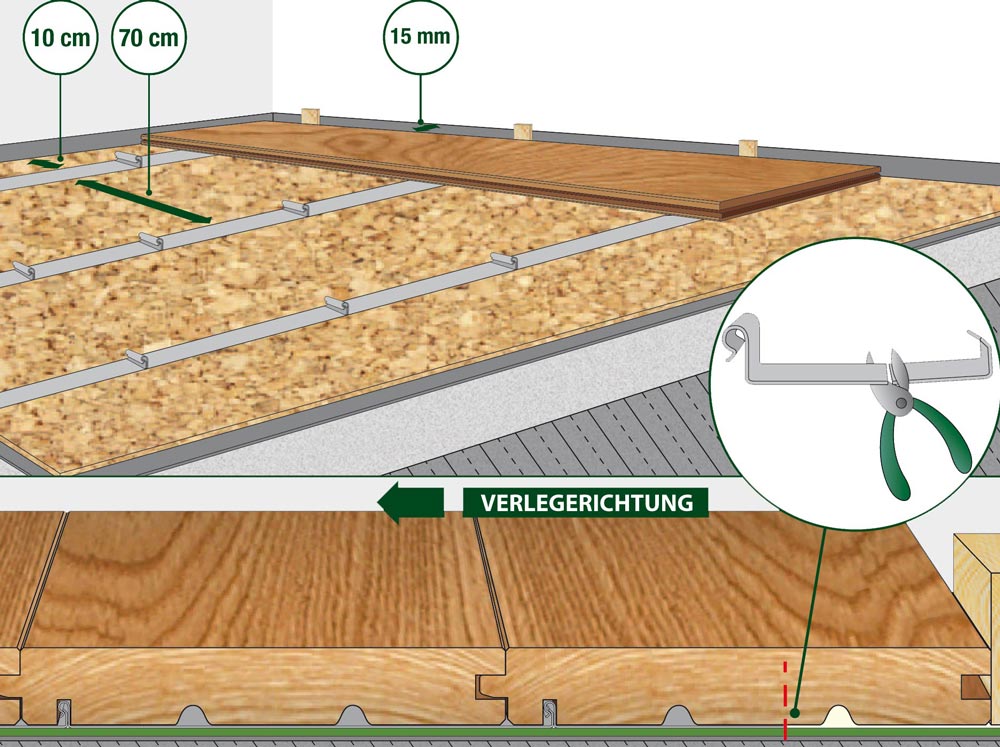
2. Relocation
Press the clamps into each other and lay the chain at a distance of 70 cm.
DANGER: Pay attention to the laying direction of the staple chain and the solid wood plank! Laying with clamps is suitable for small room sizes (max. 4 m laying width). Maintain wall distances, at least 10 mm per 1 m room width, but not less than 15 mm!
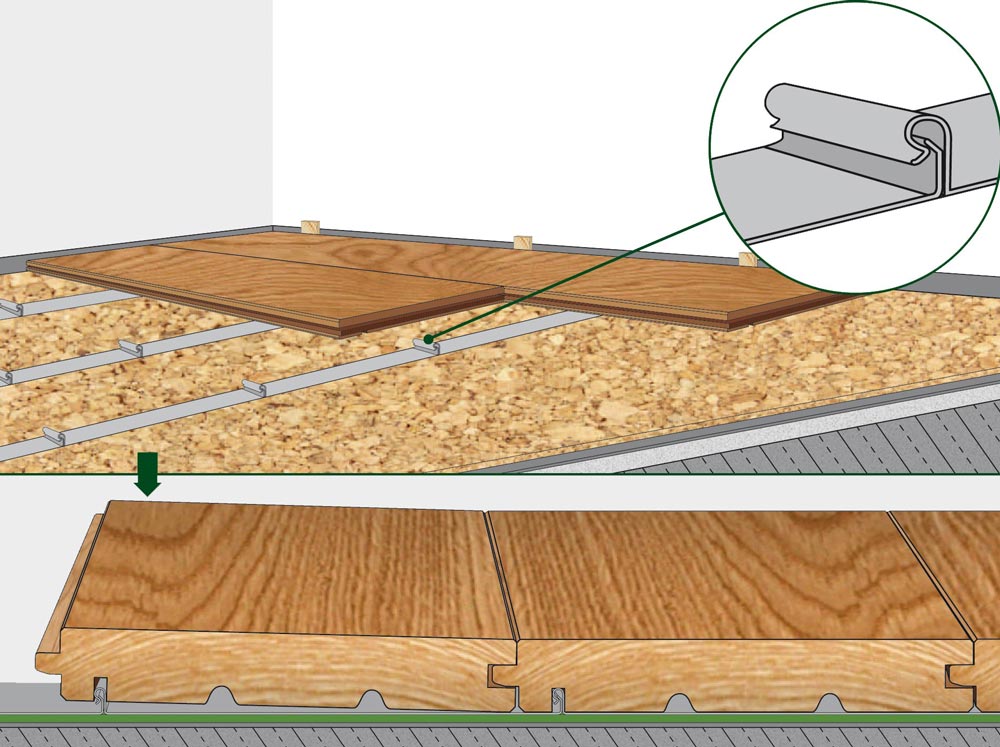
3. Laying
As you continue laying, push the planks with the groove into the tongue and click them firmly into place. In the case of soft impact sound insulation, the clamps are placed under a spatula or something similar to ensure that they snap into the clamps well. After laying the first and second row of planks, check the alignment and improve it if necessary!
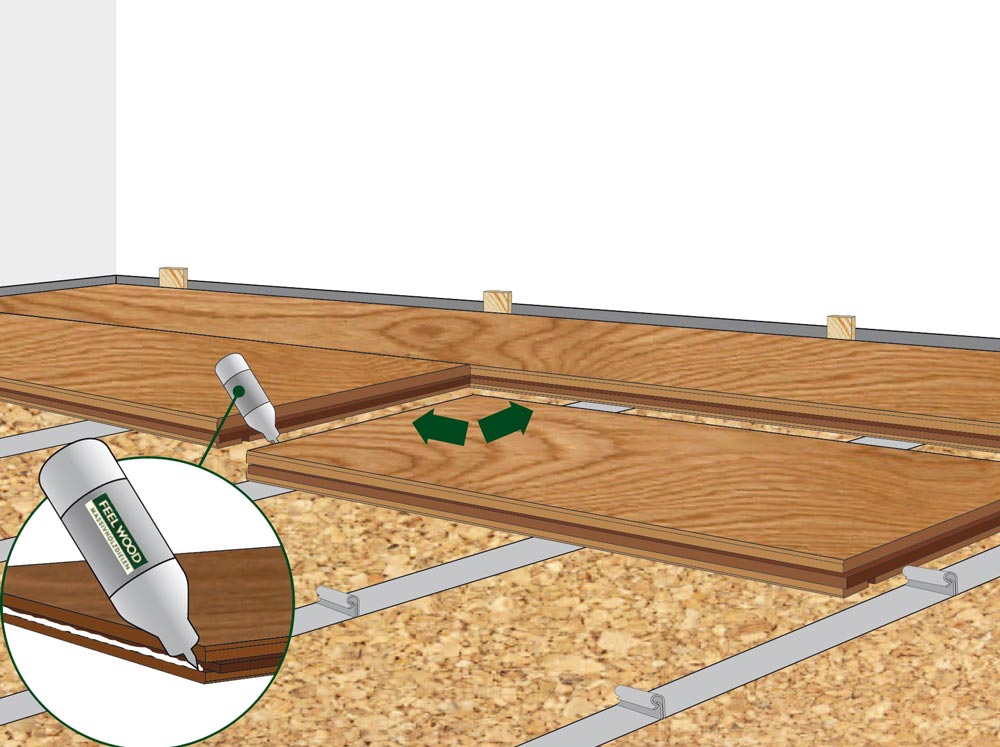
4. Gluing
Headbutts must be glued. Apply the glue only to the middle of the underside of the groove.
DANGER: Never glue lengthways!
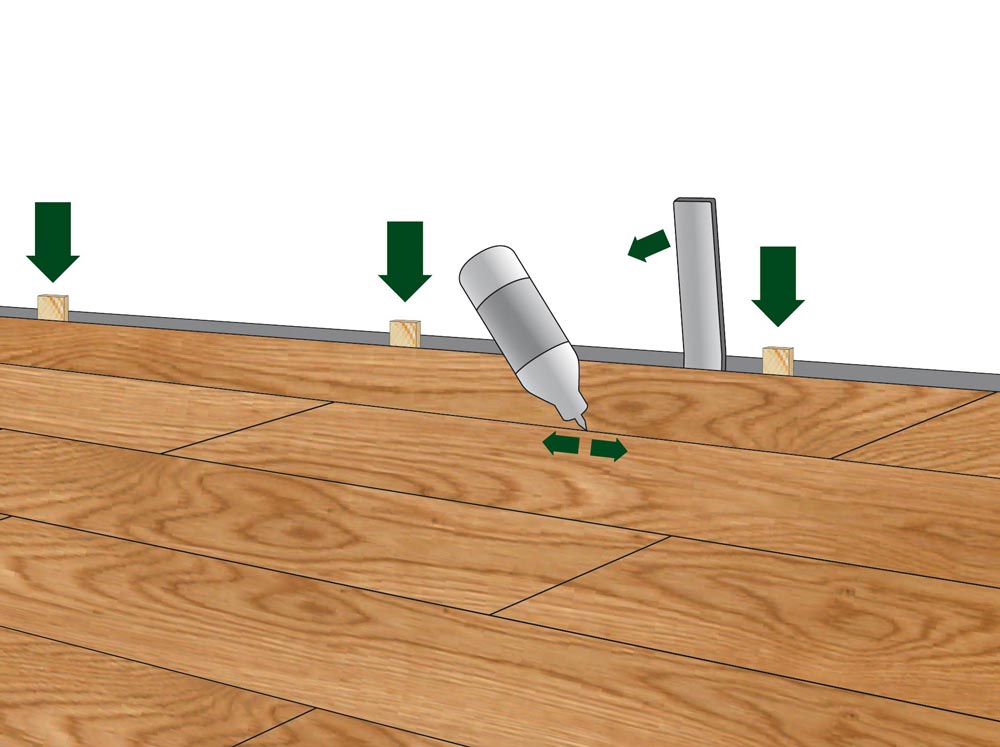
5. Wall finish
Cut the last row of planks taking the distance from the wall into account. This last row can be glued lengthwise.
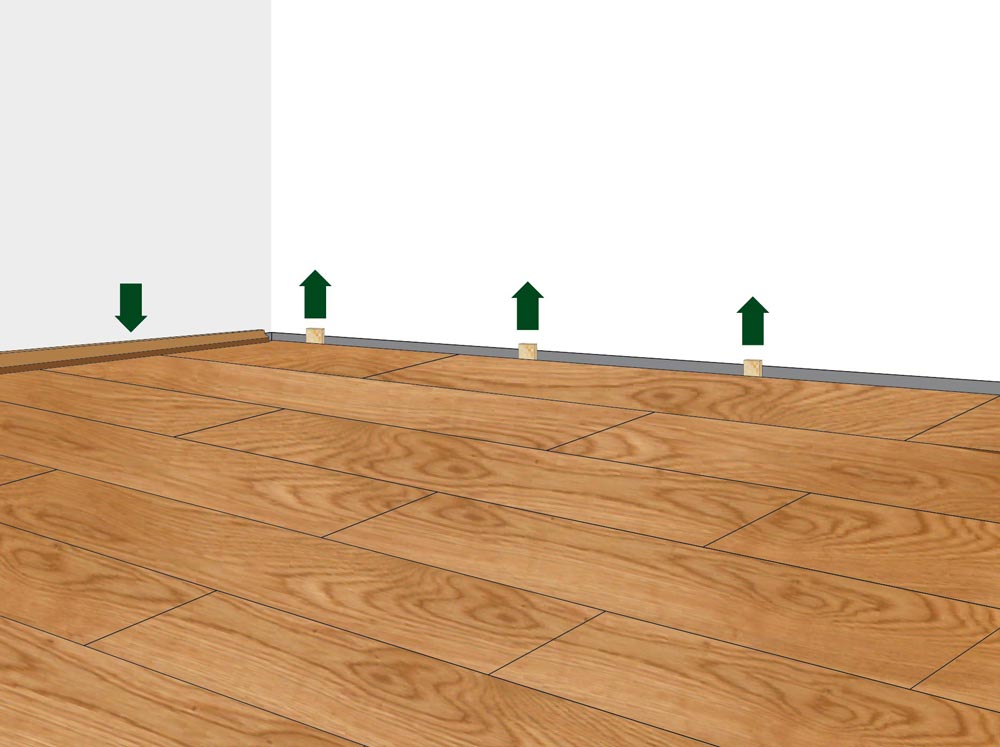
6. Attach the skirting board
After the glue has dried, remove the wedges and cover the gaps to the wall with the skirting board.
Practical instructions and video
Would you like to find out more about laying FEEL WOOD solid wood floorboards with clamps?
With screws

Laying with screws
Tool checklist
hammer
Hitting block
Wedges
saw

floorboard screws

Cordless screwdriver
Variant 1
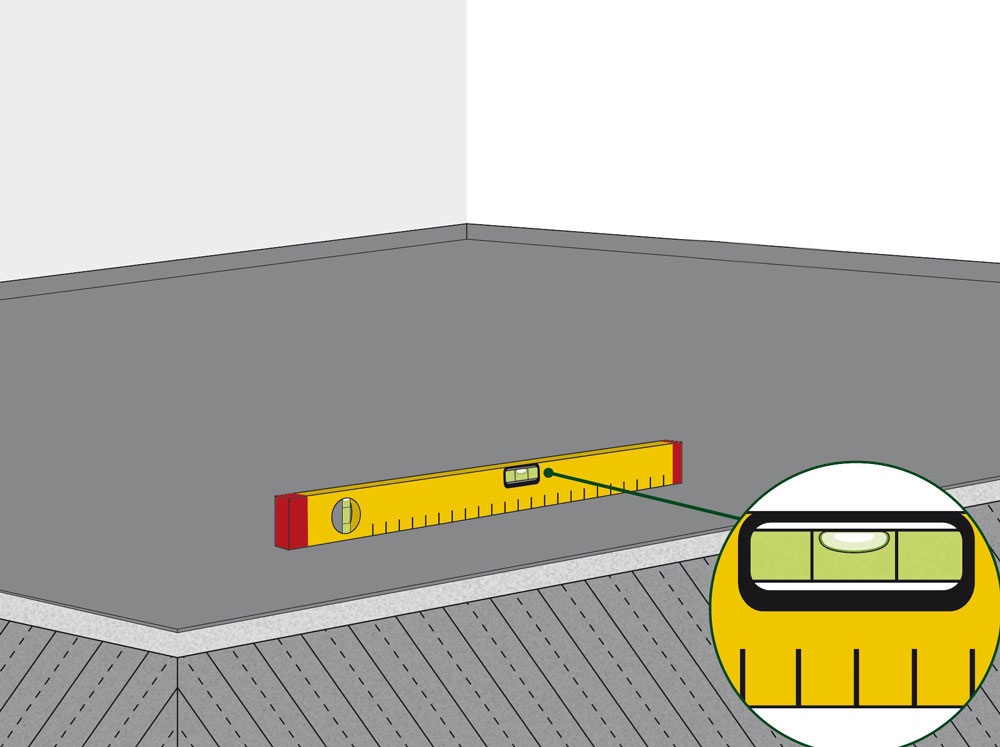
1. Preparation
The surface must be firm, level and dry. If there is a risk of rising damp, a moisture barrier (e.g. PE film 200μ) must be installed and pulled up a little on the walls.
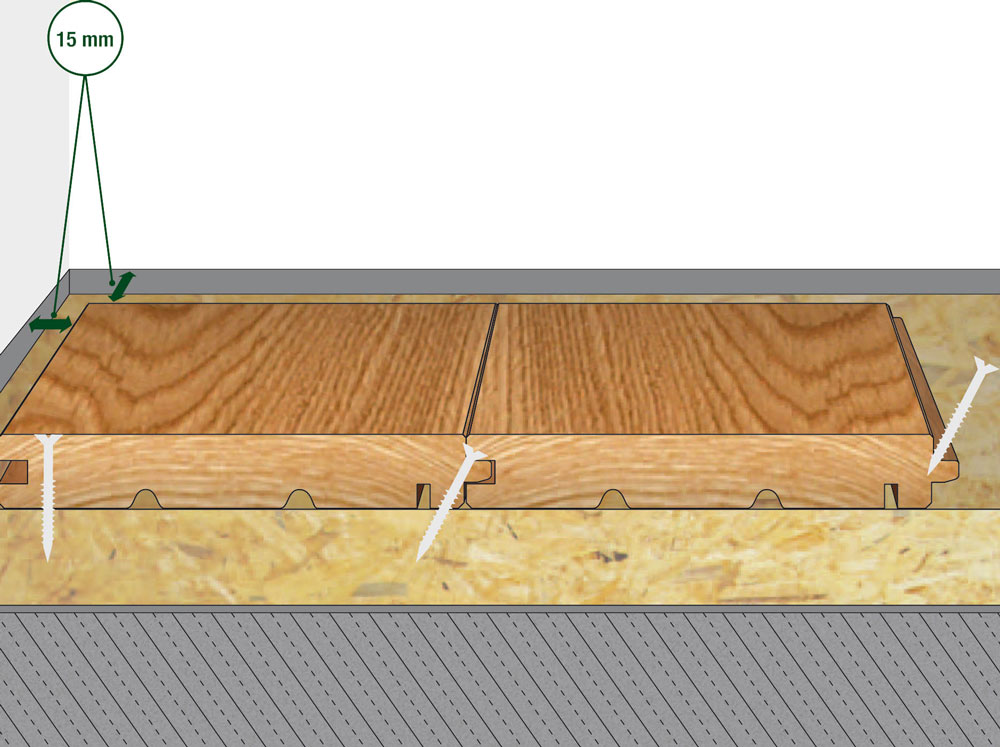
2. Substructure 1
Laying on screw-proof panels, e.g. OSB panels. Maintain wall distances of at least 15 mm. Align the first series of planks with the groove towards the wall and screw them onto the board from above.
After laying the first and second row of planks, check the alignment and improve it if necessary!
3. Screwing
Screw the following rows of floorboards covered by the spring using special floorboard screws. Screw the last row of planks again from above – like the first.
Variant 2
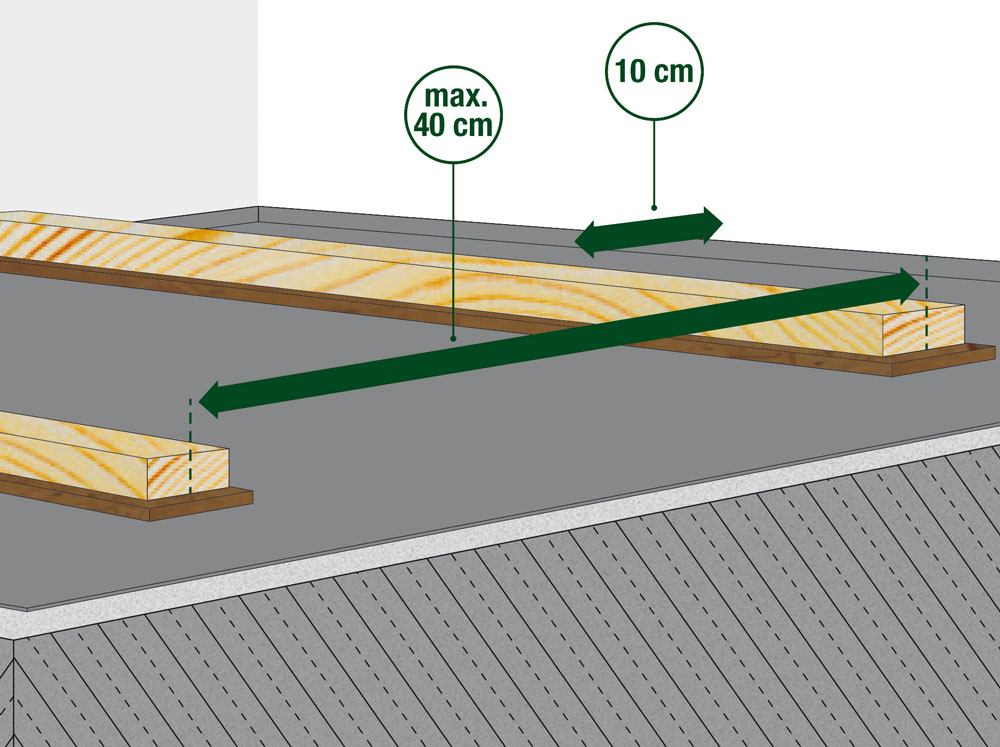
1. Substructure
A second variant is to lay the floor on dried timbers, which are laid floating on impact sound insulation strips (e.g. coconut fiber) at a distance of max. 40 cm.
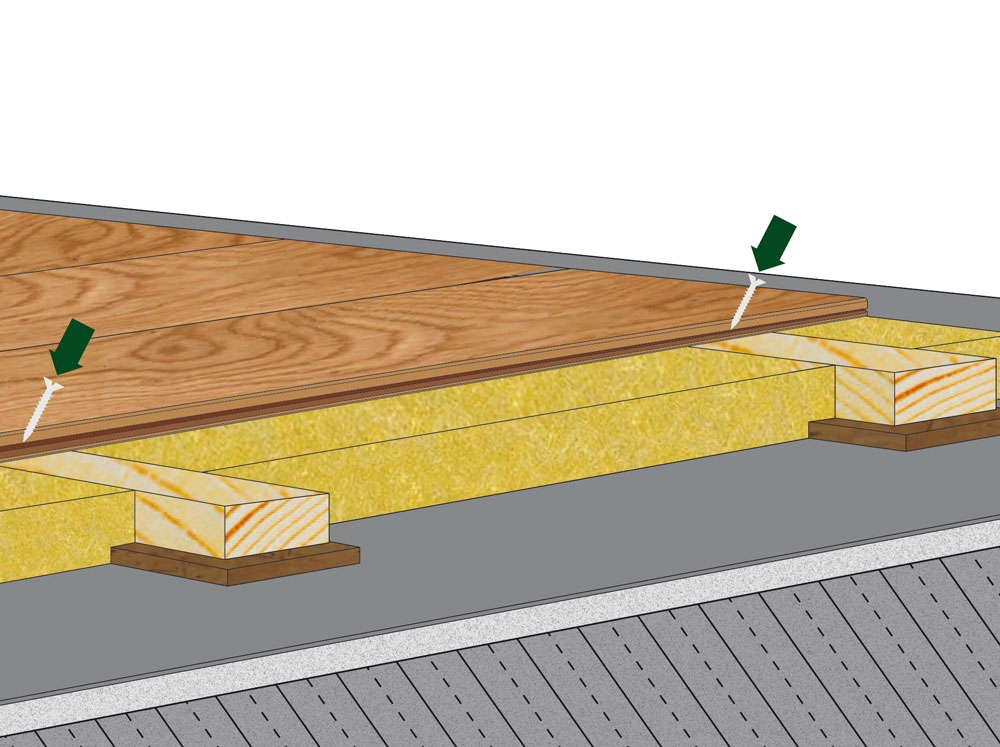
2. Substructure/screwing
Fill the cavity between the bearing timbers with fill or insulation (e.g. cellulose). Screw the planks through the spring onto the bearing timbers using special plank screws.
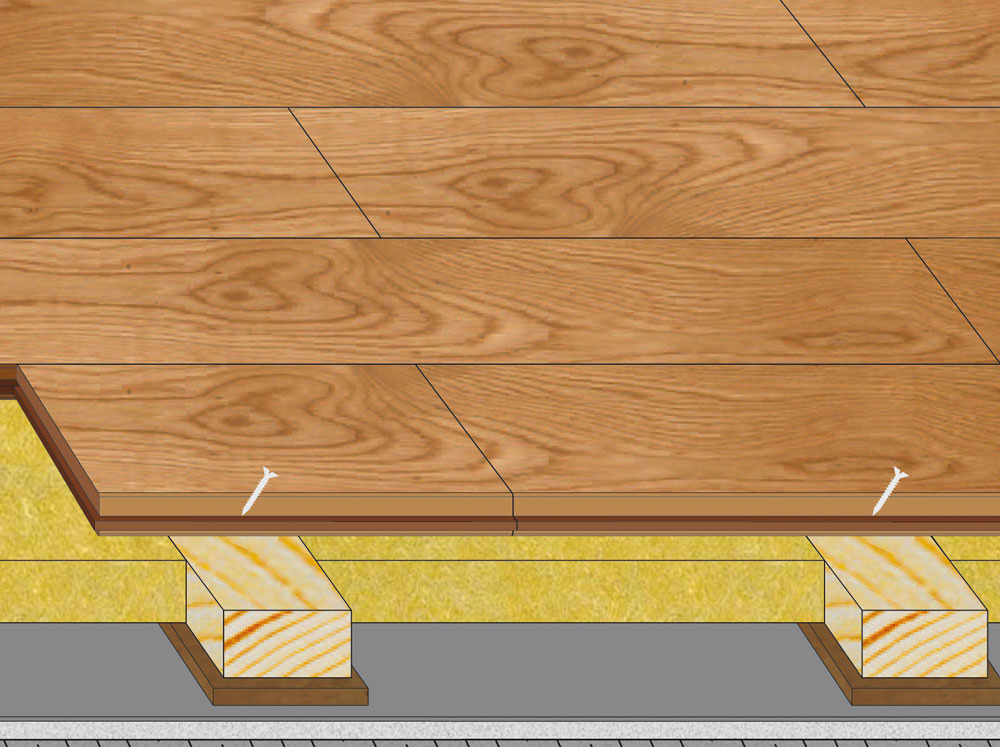
3. Screwing
Beat the planks together with a hammering block and secure them by pressing them together. The last row of planks – like the first – is screwed from above.
Practical instructions and video
Would you like to find out more about laying FEEL WOOD solid wood floorboards with screws?
With glue

Laying with adhesive
Tool checklist
hammer
Hitting block
Wedges
saw

Spatula B11
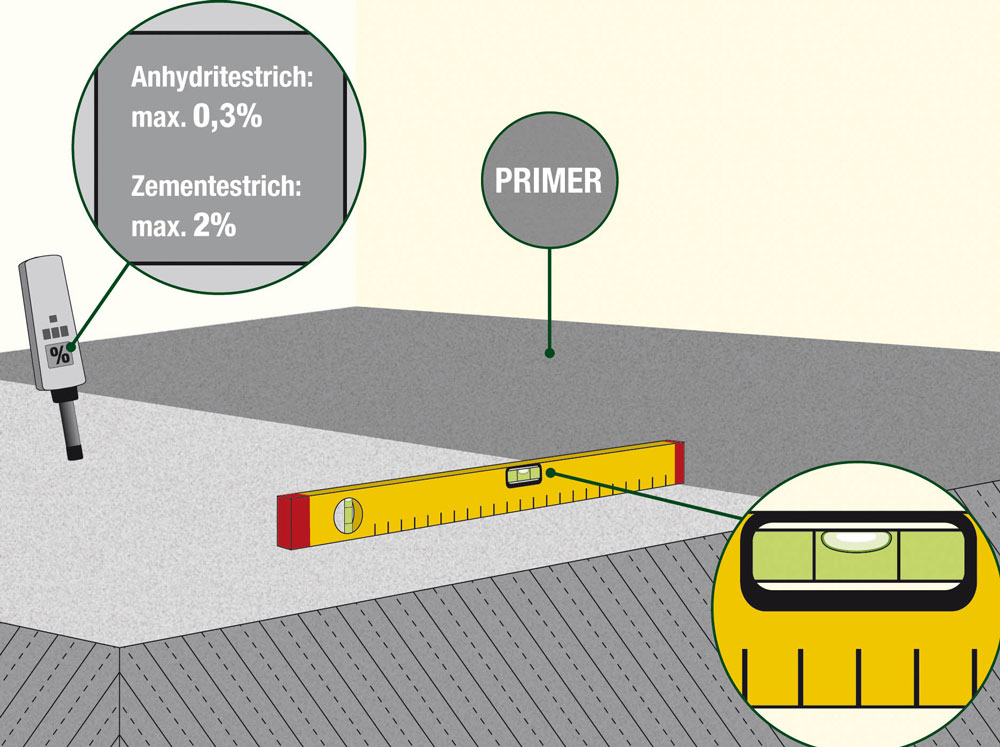
1. Preparation/substructure
The surface must be firm, level and dry. Undercoating with a primer recommended by the manufacturer serves to strengthen the surface and acts as a moisture barrier.
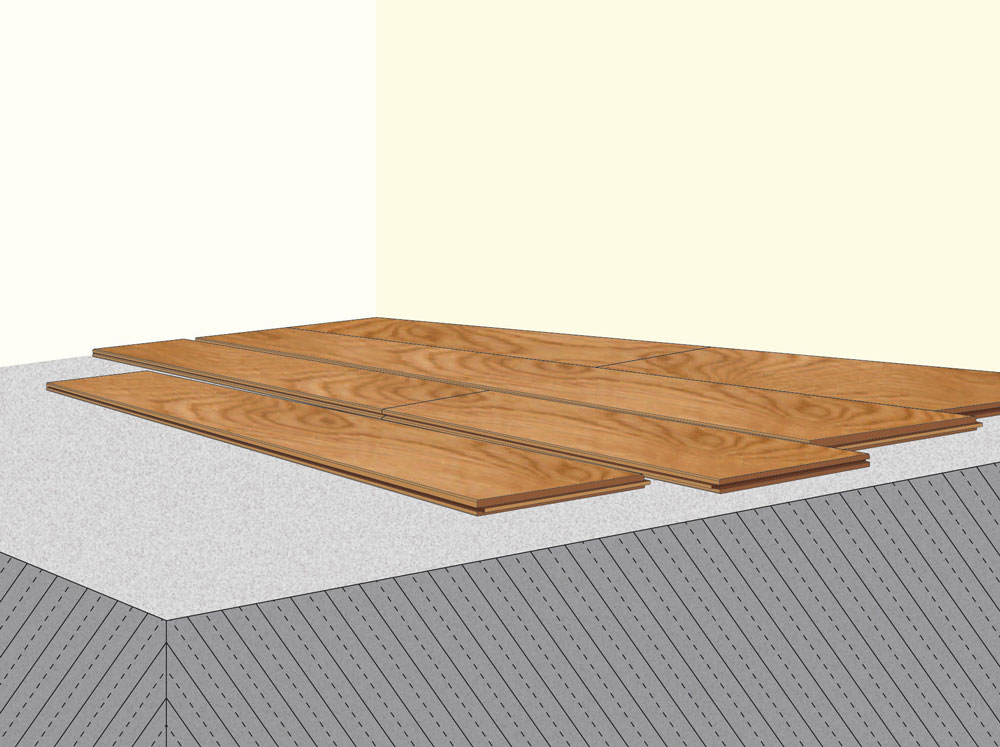
2. Relocation
Before the planks are finally glued, it is recommended to first lay them out loosely in order to achieve the desired sorting pattern/overall appearance.
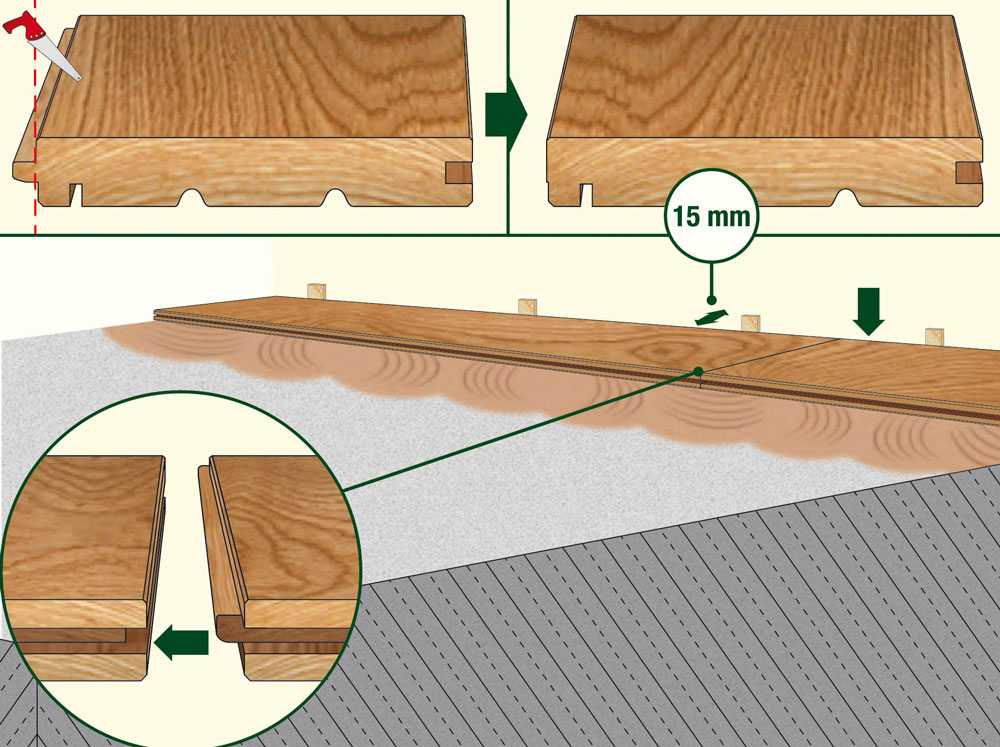
3. Bonding/laying
Apply the adhesive using the appropriate spatula according to the manufacturer's instructions. Place the first row of planks in the adhesive bed with a distance of at least 15 mm from the wall. After laying the first rows of planks, check the alignment and improve it if necessary! Before laying the further rows of boards, ensure that the first row of boards is solidified.
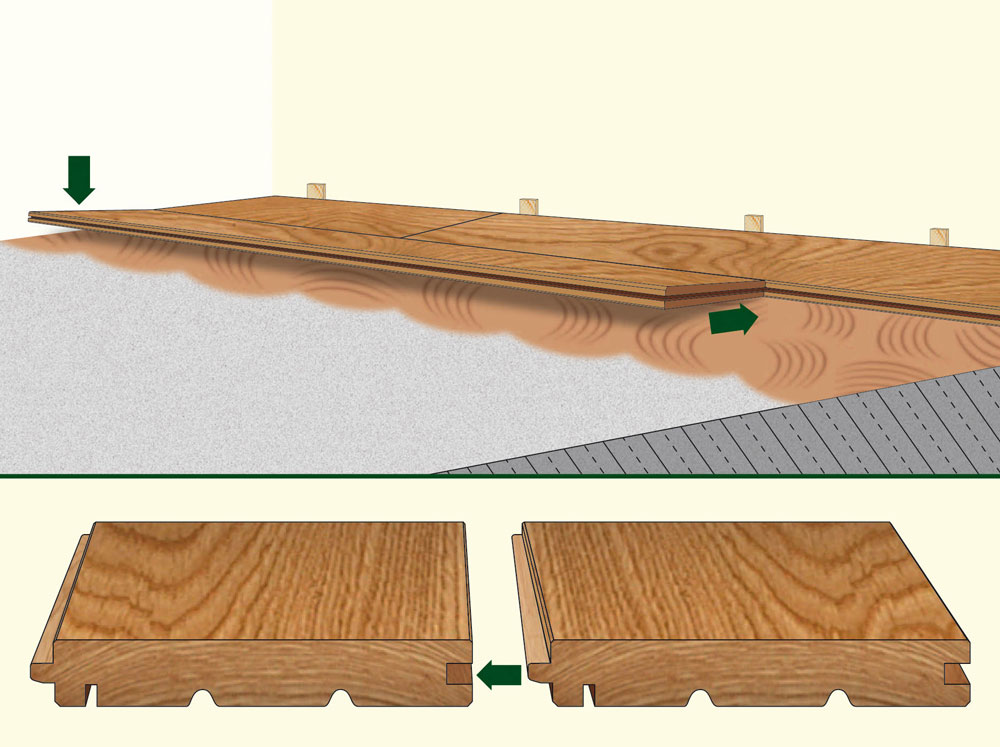
4. Bonding/laying
Insert the other planks into the tongue and groove connection and make sure that the plank lies completely in the adhesive bed.
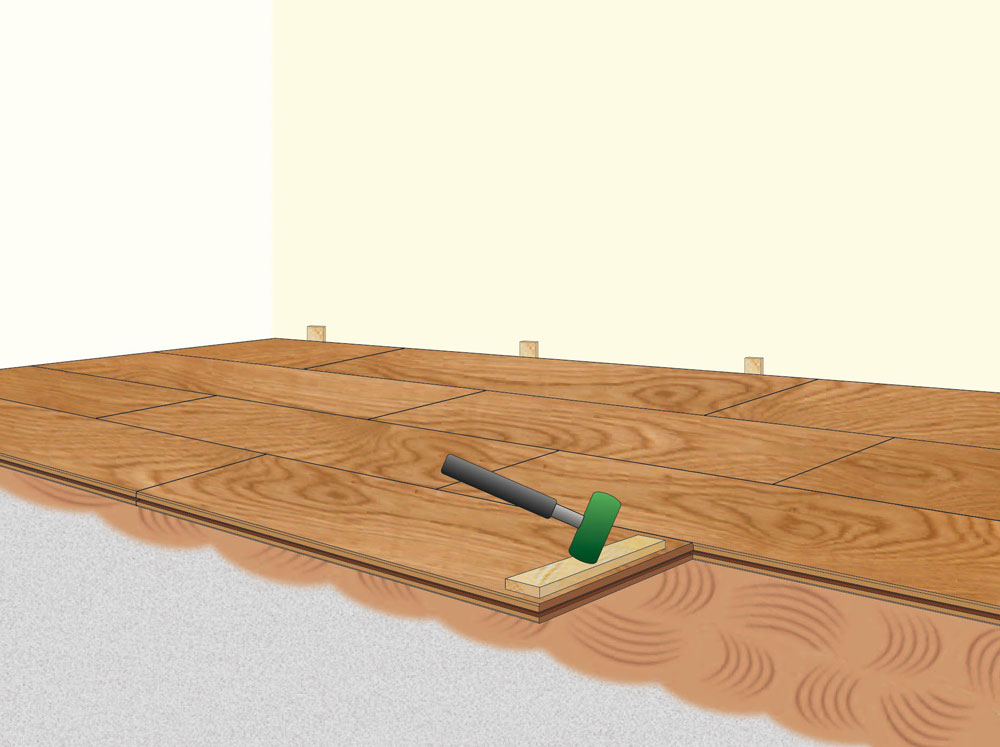
5. Bonding/laying
ATTENTION – The usual expansion joints provided must be maintained for all fixed components (including door frames, heating pipes, etc.)! If necessary, put weight on the floorboards (sandbag or similar).
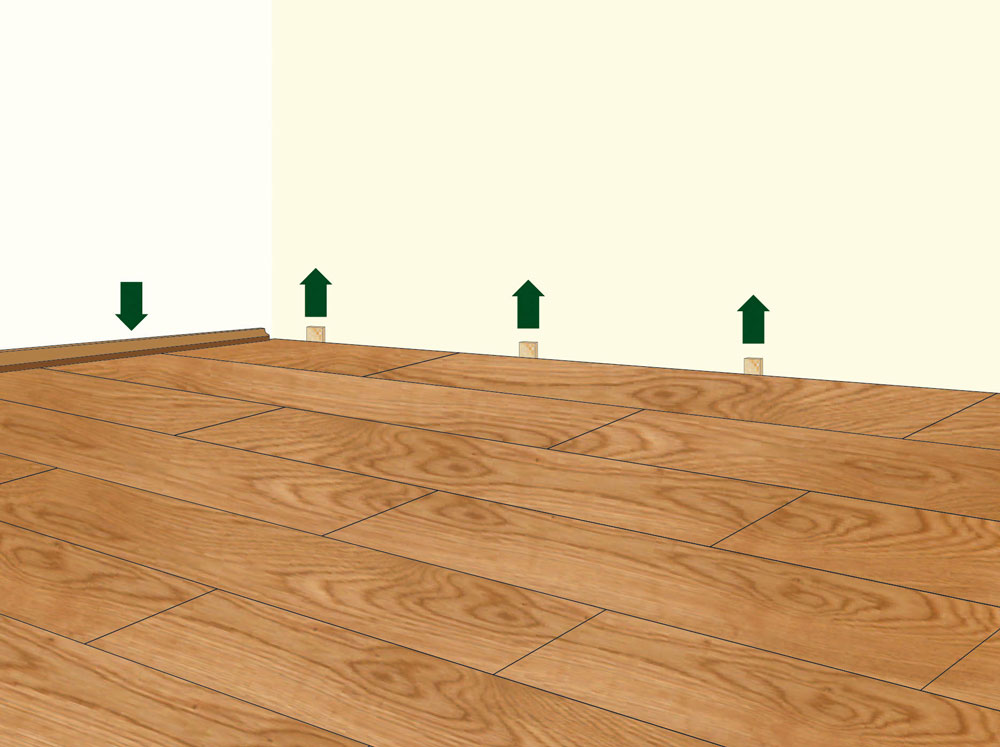
6. Attach the skirting board
After installation, remove the wedges and cover the gaps to the wall with a skirting board.
Practical instructions and video
Would you like to find out more about laying FEEL WOOD solid wood floorboards with adhesive?
On underfloor heating

Full-surface bonding to underfloor heating
Full-surface gluing of solid wood floorboards is the usual and therefore most common type of installation. The FEEL WOOD solid wood plank is made from one piece of wood and is ideal for laying on underfloor heating.

Floating bracket floor installation on underfloor heating
Floating installation is a type of installation of solid wood floors in which the individual solid wood floorboards are not screwed to the subsurface or glued over the entire surface.
Advantages of floating installation with the FEEL WOOD clamp floor system
- quick, easy installation, ready to live in straight away
- glue-free
- tension-free solid wood floorboards
- without delamination problems
- without surface cracking problems
- easy to expand, easy to renovate

Drywall elements with underfloor heating
The FEEL WOOD solid wood plank is approved for installation on all drywall systems
- Fully glued
- screwed to structural timbers
- floating with brackets
Solid wood floorboards in various types of wood are ideal for laying on drywall elements. The combination of underfloor heating drywall elements with the FEEL WOOD solid wood floorboard represents an ideal system solution in renovations and new buildings.
No moisture is introduced into the object. The rooms can be used immediately after installation. An ideal system solution can be found on all existing surfaces and can also be implemented with very low installation heights.
No moisture is introduced into the object. The rooms can be used immediately after installation. An ideal system solution can be found on all existing surfaces and can also be implemented with very low installation heights.
Practical instructions
Would you like to find out more about laying FEEL WOOD solid wood floorboards on underfloor heating?
Laying with brackets
Tool checklist
hammer
Hitting block
Wedges
saw
glue
Tin snips
1. Preparation
The surface must be firm, level and dry. If there is a risk of rising damp, a moisture barrier (e.g. PE film 200μ) must be installed and pulled up a little on the walls. For impact sound insulation, we recommend rolled cork or impact sound insulation with a built-in vapor barrier.
2. Relocation
Press the clamps into each other and lay the chain at a distance of 70 cm.
DANGER: Pay attention to the laying direction of the staple chain and the solid wood plank! Laying with clamps is suitable for small room sizes (max. 4 m laying width). Maintain wall distances, at least 10 mm per 1 m room width, but not less than 15 mm!
3. Laying
As you continue laying, push the planks with the groove into the tongue and click them firmly into place. In the case of soft impact sound insulation, the clamps are placed under a spatula or something similar to ensure that they snap into the clamps well. After laying the first and second row of planks, check the alignment and improve it if necessary!
4. Gluing
Headbutts must be glued. Apply the glue only to the middle of the underside of the groove.
DANGER: Never glue lengthways!
5. Wall finish
Cut the last row of planks taking the distance from the wall into account. This last row can be glued lengthwise.
6. Attach the skirting board
After the glue has dried, remove the wedges and cover the gaps to the wall with the skirting board.
Practical instructions and video
Would you like to find out more about laying FEEL WOOD solid wood floorboards with clamps?
Laying with screws
Tool checklist
hammer
Hitting block
Wedges
saw
floorboard screws
Cordless screwdriver
Variant 1
1. Preparation
The surface must be firm, level and dry. If there is a risk of rising damp, a moisture barrier (e.g. PE film 200μ) must be installed and pulled up a little on the walls.
2. Substructure 1
Laying on screw-proof panels, e.g. OSB panels. Maintain wall distances of at least 15 mm. Align the first series of planks with the groove towards the wall and screw them onto the board from above.
After laying the first and second row of planks, check the alignment and improve it if necessary!
3. Screwing
Screw the following rows of floorboards covered by the spring using special floorboard screws. Screw the last row of planks again from above – like the first.
Variant 2
1. Substructure
A second variant is to lay the floor on dried timbers, which are laid floating on impact sound insulation strips (e.g. coconut fiber) at a distance of max. 40 cm.
2. Substructure/screwing
Fill the cavity between the bearing timbers with fill or insulation (e.g. cellulose). Screw the planks through the spring onto the bearing timbers using special plank screws.
3. Screwing
Beat the planks together with a hammering block and secure them by pressing them together. The last row of planks – like the first – is screwed from above.
Practical instructions and video
Would you like to find out more about laying FEEL WOOD solid wood floorboards with screws?
Laying with adhesive
Tool checklist
hammer
Hitting block
Wedges
saw
Spatula B11
1. Preparation/substructure
The surface must be firm, level and dry. Undercoating with a primer recommended by the manufacturer serves to strengthen the surface and acts as a moisture barrier.
2. Relocation
Before the planks are finally glued, it is recommended to first lay them out loosely in order to achieve the desired sorting pattern/overall appearance.
3. Bonding/laying
Apply the adhesive using the appropriate spatula according to the manufacturer's instructions. Place the first row of planks in the adhesive bed with a distance of at least 15 mm from the wall. After laying the first rows of planks, check the alignment and improve it if necessary! Before laying the further rows of boards, ensure that the first row of boards is solidified.
4. Bonding/laying
Insert the other planks into the tongue and groove connection and make sure that the plank lies completely in the adhesive bed.
5. Bonding/laying
ATTENTION – The usual expansion joints provided must be maintained for all fixed components (including door frames, heating pipes, etc.)! If necessary, put weight on the floorboards (sandbag or similar).
6. Attach the skirting board
After installation, remove the wedges and cover the gaps to the wall with a skirting board.
Practical instructions and video
Would you like to find out more about laying FEEL WOOD solid wood floorboards with adhesive?
Full-surface bonding to underfloor heating
Full-surface gluing of solid wood floorboards is the usual and therefore most common type of installation. The FEEL WOOD solid wood plank is made from one piece of wood and is ideal for laying on underfloor heating.
Floating bracket floor installation on underfloor heating
Floating installation is a type of installation of solid wood floors in which the individual solid wood floorboards are not screwed to the subsurface or glued over the entire surface.
Advantages of floating installation with the FEEL WOOD clamp floor system
- quick, easy installation, ready to live in straight away
- glue-free
- tension-free solid wood floorboards
- without delamination problems
- without surface cracking problems
- easy to expand, easy to renovate
Drywall elements with underfloor heating
The FEEL WOOD solid wood plank is approved for installation on all drywall systems
- Fully glued
- screwed to structural timbers
- floating with brackets
Solid wood floorboards in various types of wood are ideal for laying on drywall elements. The combination of underfloor heating drywall elements with the FEEL WOOD solid wood floorboard represents an ideal system solution in renovations and new buildings.
No moisture is introduced into the object. The rooms can be used immediately after installation. An ideal system solution can be found on all existing surfaces and can also be implemented with very low installation heights.
No moisture is introduced into the object. The rooms can be used immediately after installation. An ideal system solution can be found on all existing surfaces and can also be implemented with very low installation heights.
Practical instructions
Would you like to find out more about laying FEEL WOOD solid wood floorboards on underfloor heating?
FEEL the WOOD
In our fascinating blog about solid wood flooring we offer a wealth of advice on installation and care, as well as lifestyle ideas and reference projects that we are really proud of.
When you visit him you will quickly understand why.


